Continuing after a failed print
Since I had to leave before my print was finished, I unplugged the machine hoping it would continue the next day where it left of, just like the Prusa i3 does. Unfortunately that did not work, so I tried to figure out a way to continue the print manually. I found multiple tutorials and I decided to combine the following comment with the second method from this website.
What I do is measure the height of the print using digital calipers. Open your slicing software and offset the Z on the print that amount. The idea is that the bottom of the print is below the bed surface and the resume point is where your print starts. Be sure to disable your start up script (bed level, purge nozzle, etc), skirts, and rafts. I also start the first couple of layers a little hotter too. This will help it bond better to the cold print. If your bed isn’t to far out of level and your measurement is good, it’ll work. Good luck. source
https://www.youtube.com/watch?time_continue=9&v=PVtLCwXjEXE
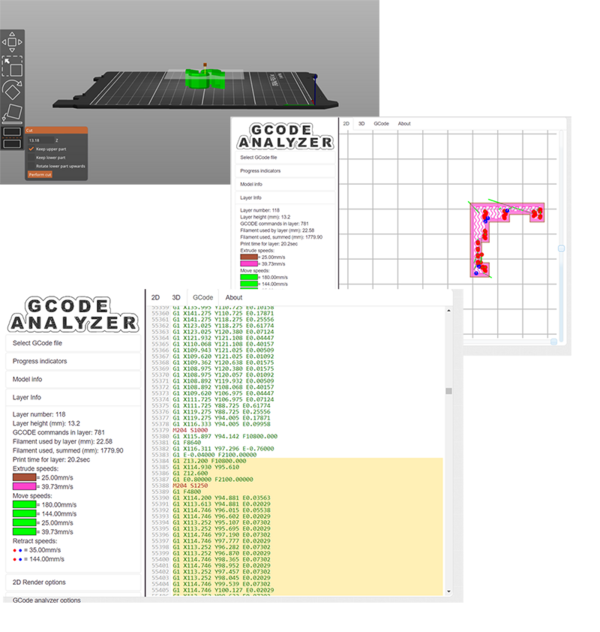
The offset I measured was 13.18mm and using GCode viewer I found the closest layer (13.20mm) then I deleted all of the already printed layers in the gcode. I also added a line in the setup hoping it would let the extruder approach the model from the correct height (at least, I hoped it would do that. I added “G1 Z15.0 F13200 ;”). According to the tutorials it should have been there already but since I use PrusaSlicer my gcode is a bit different.
When I finally thought the file should be OK I started the print - and the extruder immediately bumped into my print and knocked it from the glass plate. So that did not work in the end but I will try again in the future.
Second try at continuing a failed print
My print was going fine until a colleague accidentally touched the restart button, so this will be the second try to modify the gcode. Using GCode viewer I could tell that my print stopped halfway through layer 19. I will continue printing from layer 20, so I looked for that layer in GCode viewer and deleted all previous layers in the gcode. This time I added a line to set the feed rate for the first move, and that worked so that’s probably what went wrong the first time I tried to continue the print.
This is the fourth version of the test code to see if the Z-axis moved as specified.
G21; Set units to milimeters
G90; Set absolute coordinates
G92 E0; Reset extruder
G28 X0 Y0; Home x and y axis
G28 Z0; Home Z axis
G1 F3000; Set feed rate (speed) for first move
M0 S2
G1 Z4.200
M0 S4
G1 Z0.000
M0 S4
G0 Z4.200
G1 E0.80000 F2100.00000
M204 S800
G1 F1500
G1 X10 Y10 E0.03403
I did notice that when I continued the print, it seemed to continue from layer 18 rather than layer 20 so I am not sure if GCode viewer pointed me to the wrong layer. Below the code after the standard PrusaSlicer setup.
G1 F1000; Set feed rate (speed) for first move
G1 Z6.200
M0 S10; Pause for 10 seconds to see if the nozzle actually moves up 6.2mm as a test

G1 E-0.04000 F2100.00000
G1 Z4.300 F10800.000
M0 S5
G1 X98.249 Y90.174
G1 Z3.600
G1 E0.80000 F2100.00000
M204 S800
G1 F1500
G1 X97.256 Y90.016 E0.03403
G1 X96.359 Y89.560 E0.03405
G1 X95.649 Y88.848 E0.03405
G1 X95.192 Y87.954 E0.03397
G1 X95.034 Y86.959 E0.03410
G1 X95.192 Y85.965 E0.03408
G1 X95.649 Y85.069 E0.03404
;and continue like this
Third try
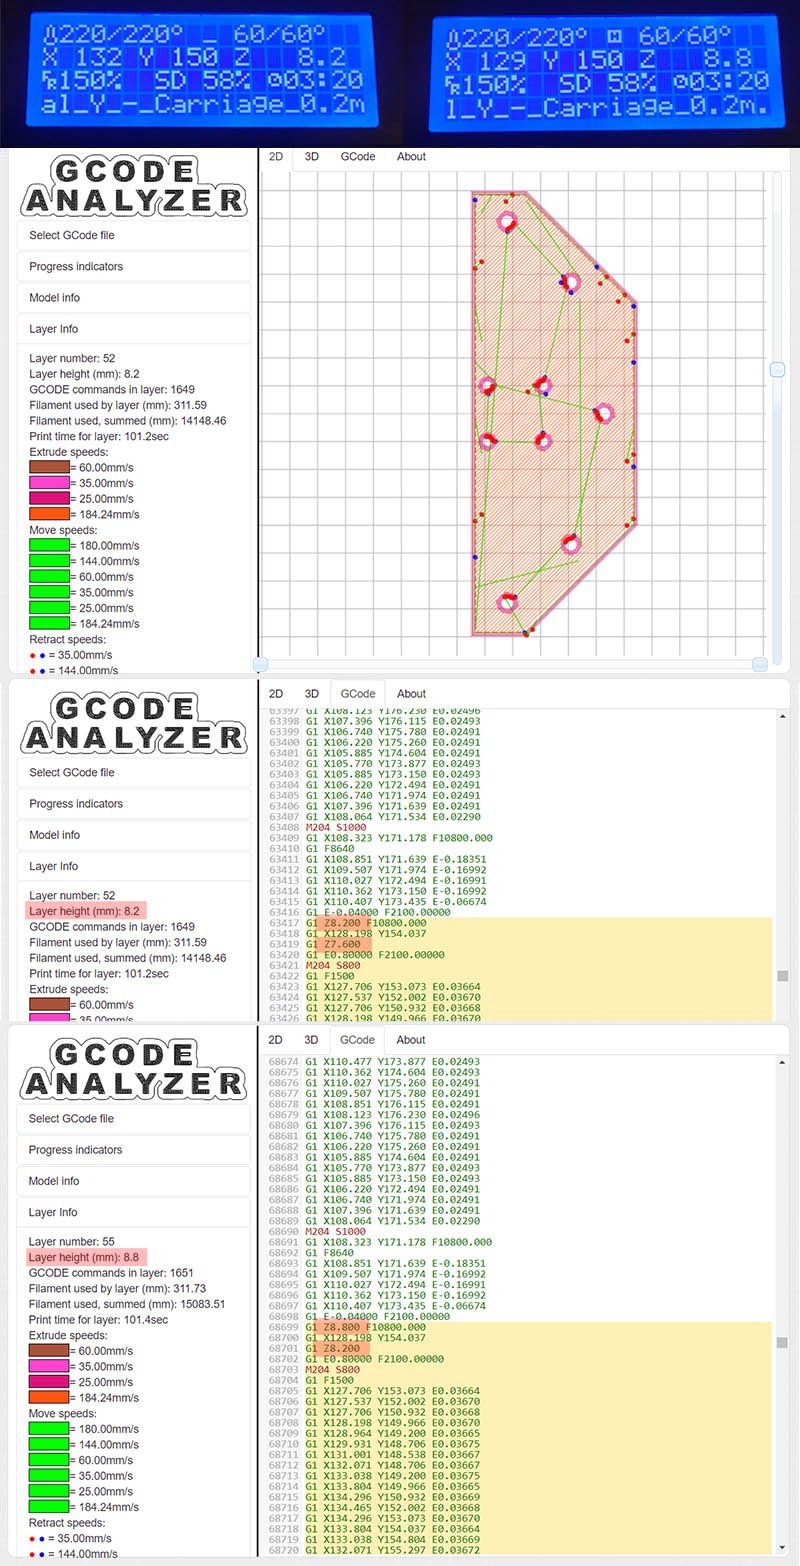
For my third encounter with continuing a print, I wanted to solve the issue that the print seemed to start with the wrong layer. Using gcode analyser I found that the layer height specified on the left actually was the height of the nozzle when ‘hovering’ over the model to the next point to print. This can be seen in the gcode on the right: the first Z value corresponds to the layer height on the left. The second value however is the actual layer height that is being printed. The values correspond to the Z values on the screen when I stopped the print, and when I modified the gcode to continue from layer 55, it worked as intended.
Another thing that should be kept in mind when continuing a print is that when the bed cools down, the temperature drop causes the material to shrink. Because of this the print is not sticking to the bed properly anymore and can be moved easily by the nozzle. By taping the brim to the bed, this can be avoided but it is not a foolproof method.